Alternator replacement DIY
#1
 11-21-2011, 01:46 AM

Tools needed
-10mm wrench or socket(battery connection)
-6mm allen (top alternator bolt)
-8mm allen (bottom alternator bolt and fan pulley bolt)
-1/2" wrench (alternator wire connection)
-flathead screwdriver (throttle body hose and alternator sensor removal)
-wrench for belt tensioner (I used an adjustable wrench)
-something thin to put through fan pulley (I used a thin allen wrench)
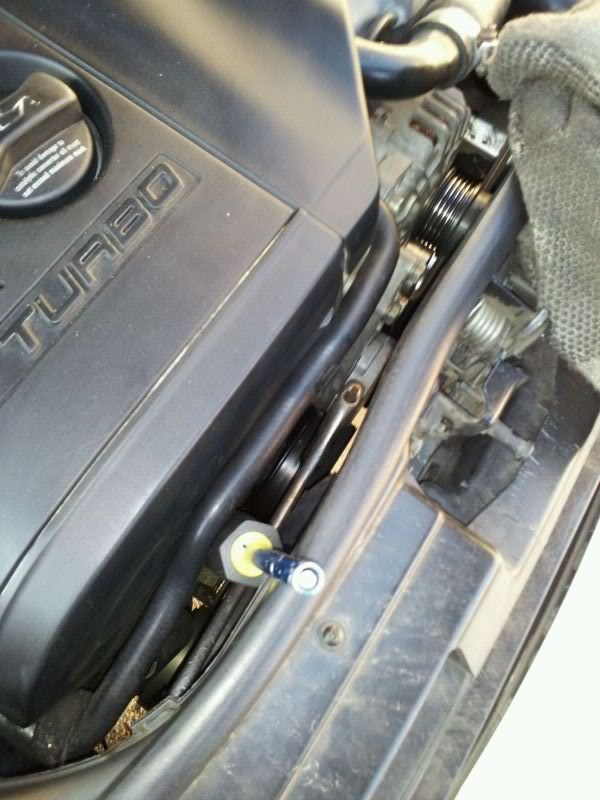
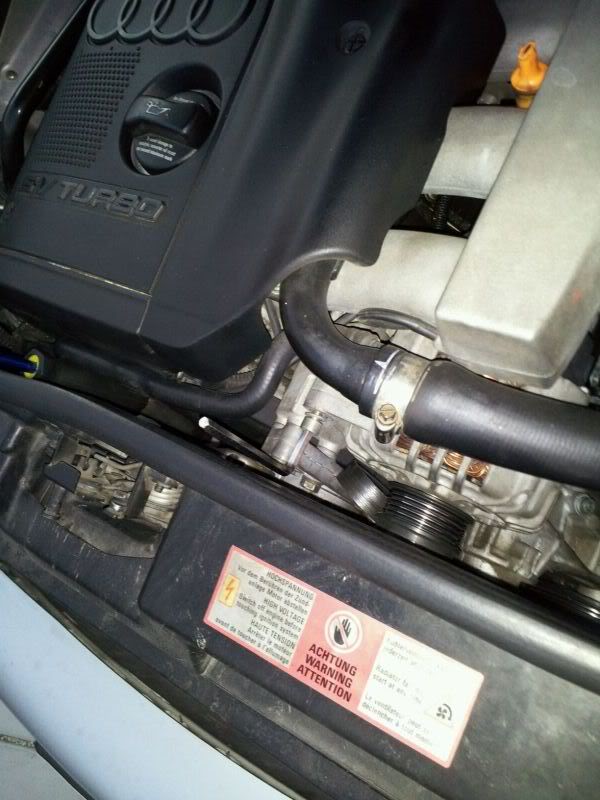
The first thing to do is to disconnect the battery using a 10mm wrench or socket. You don't want to forget this later when removing the wire connected to the alternator. Now use your flathead screwdriver to remove the two clamps holding on the hose going to the throttle body. Another thing to get out of the way is the cover going over the power steering reservoir. Next step, remove the belt going over the alternator pulley by moving the tensioner clockwise with your left hand while removing the belt with your right. To make things easier later, I left the wrench on the tensioner by wedging something in there.
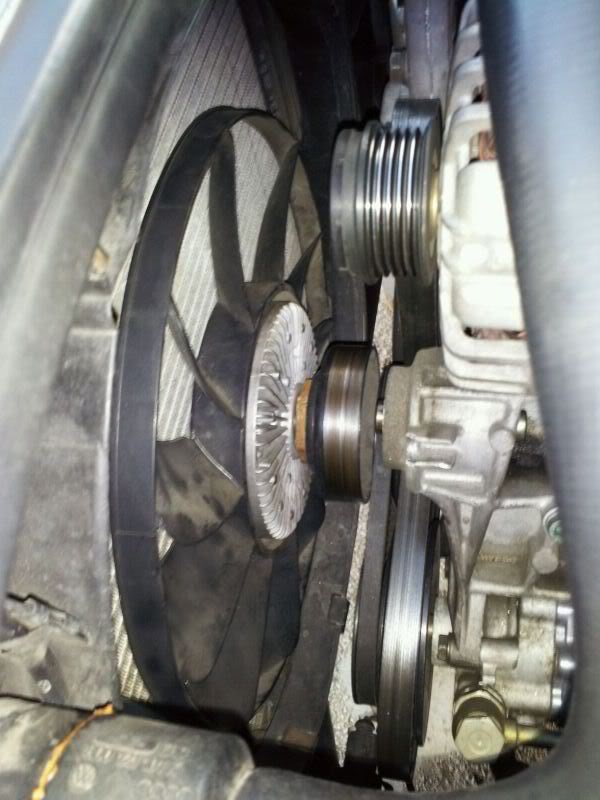
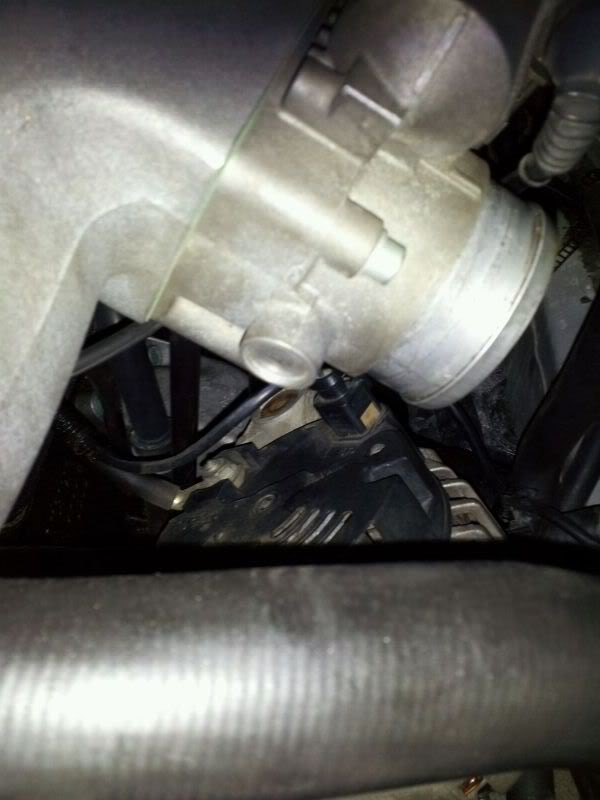
To remove the bottom alternator bolt, removing the fan pulley makes life a lot easier. To do this you need to remove an 8mm allen bolt. To keep the pulley from moving, find something thin that fits through the small holes on the pulley.
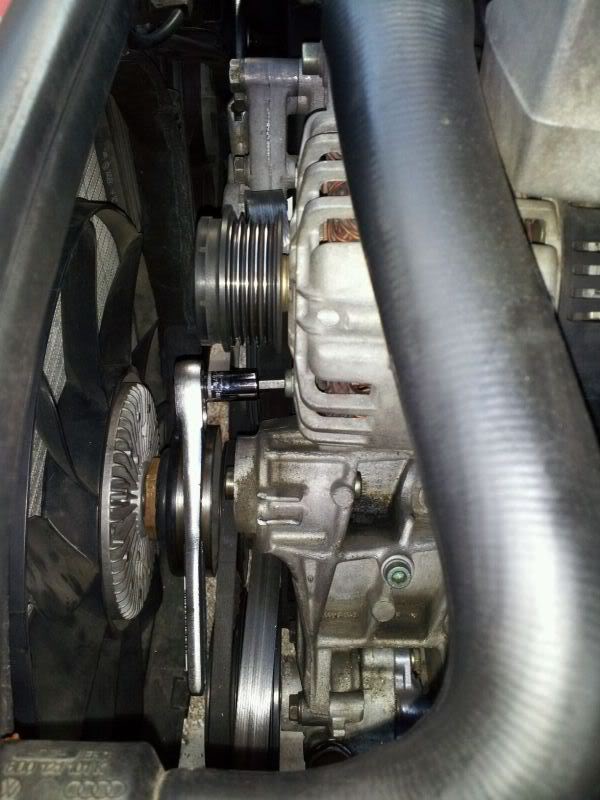
Now just pull the fan and pulley towards the radiator.
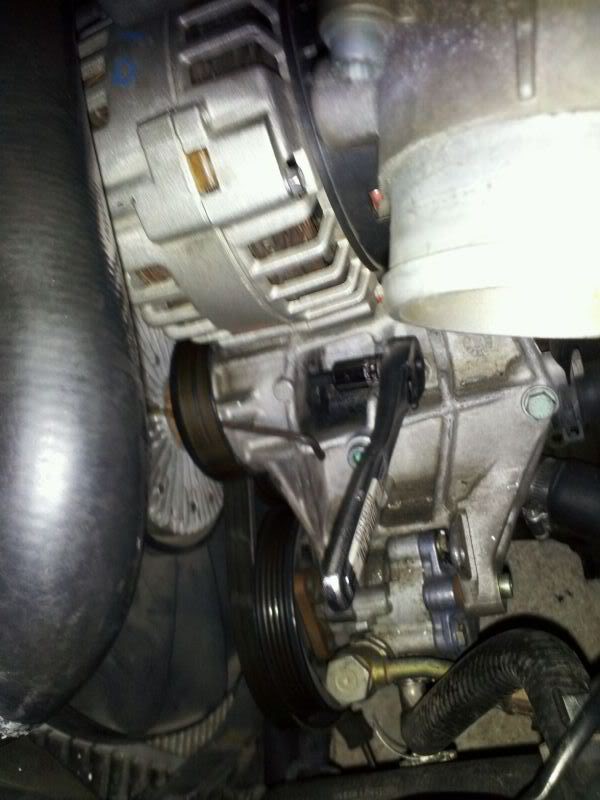
Now that you have full access to the lower alternator bolt, remove it with an 8mm allen (preferrably allen socket since these bolts are on super tight).
The top bolt is next which needs a 6mm allen. I used an actual allen wrench since I didn't have an allen socket for that size.
Wiggle the alternator and slide to the right. This might take a little persuasion. Now rest it pulley side down and remove the nut with a 1/2" wrench. You have to get at it at an angle since there is plastic around it. The sensor harness needs to be pried off using a flathead screwdriver. Mine was stuck on there like there was glue on it for some reason.
Now you can pull it out carefully and install the new one in the reverse order.
-10mm wrench or socket(battery connection)
-6mm allen (top alternator bolt)
-8mm allen (bottom alternator bolt and fan pulley bolt)
-1/2" wrench (alternator wire connection)
-flathead screwdriver (throttle body hose and alternator sensor removal)
-wrench for belt tensioner (I used an adjustable wrench)
-something thin to put through fan pulley (I used a thin allen wrench)
The first thing to do is to disconnect the battery using a 10mm wrench or socket. You don't want to forget this later when removing the wire connected to the alternator. Now use your flathead screwdriver to remove the two clamps holding on the hose going to the throttle body. Another thing to get out of the way is the cover going over the power steering reservoir. Next step, remove the belt going over the alternator pulley by moving the tensioner clockwise with your left hand while removing the belt with your right. To make things easier later, I left the wrench on the tensioner by wedging something in there.
To remove the bottom alternator bolt, removing the fan pulley makes life a lot easier. To do this you need to remove an 8mm allen bolt. To keep the pulley from moving, find something thin that fits through the small holes on the pulley.
Now just pull the fan and pulley towards the radiator.
Now that you have full access to the lower alternator bolt, remove it with an 8mm allen (preferrably allen socket since these bolts are on super tight).
The top bolt is next which needs a 6mm allen. I used an actual allen wrench since I didn't have an allen socket for that size.
Wiggle the alternator and slide to the right. This might take a little persuasion. Now rest it pulley side down and remove the nut with a 1/2" wrench. You have to get at it at an angle since there is plastic around it. The sensor harness needs to be pried off using a flathead screwdriver. Mine was stuck on there like there was glue on it for some reason.
Now you can pull it out carefully and install the new one in the reverse order.
Last edited by A4 2000; 10-23-2013 at 10:31 PM.
#2
11-21-2011, 06:11 AM
Nice - like I've done before, I'll leave this here a few days so people see it and know it exists before moving it to the DIY area.
#4
10-22-2013, 01:25 AM

I swapped out a dead alternator recently and this thread was extremely helpful. However there was one step that I had a lot of trouble with, and based on searching around the web it seems like many people get stuck at the same step. This one:
First off, you *have* to remove the fan because it's impossible to get the bottom alternator bolt out if you don't. So don't even bother trying to avoid this.
It was physically impossible to loosen the fan pulley this way, at least in my car and seemingly many other peoples' as well. The bolt is just too tight and you end up bending the metal stopper (e.g. the allen wrench in the 2nd pic) far before you can loosen the fan bolt. I tried at least five different pieces of metal procured at various hardware stores and all of them ended up bending like paper under that much stress. The hole in the pulley isn't very big (it's exactly 5mm) and there's only so much shearing strength you can get from a small metal rod or allen wrench. Whomever that works for must not have their fan pulley bolt on very tight.
After much head scratching and net surfing I finally decided to try a different tactic: use a strap wrench to grip the pulley itself directly from the pulley surface. My local hardware store had several strap wrenches and I was able to get one with a nice long rubber strap for $10. It took a while to thread it around the pulley and get a super nice and tight grip on it, but once I finally had it I pulled it tight with all my strength while a friend yanked on the fan bolt with a socket wrench, and we finally got the damn thing off! And with the strap wrench there is absolutely no damage to the pulley. (I had read at least one post somewhere about someone using a massive pliers and buffering it with a cloth, but I would be worried about contorting the pulley.)
Another small thing that I had trouble with was getting the alternator out of the car once it was completely disconnected, even after removing the intake hose. There just wasn't enough room to slip it out of the car, and I really didn't want to disconnect the coolant hose or remove the TB. I ended up loosening all the bolts on the coolant reservoir and on the cage holding the brake vacuum booster, and was able to finally get the alternator out by letting it shove all that stuff aside a half inch or so.
This was on a 2001 1.8T AWM.
To remove the bottom alternator bolt, removing the fan pulley makes life a lot easier. To do this you need to remove an 8mm allen bolt. To keep the pulley from moving, find something thin that fits through the small holes on the pulley.
It was physically impossible to loosen the fan pulley this way, at least in my car and seemingly many other peoples' as well. The bolt is just too tight and you end up bending the metal stopper (e.g. the allen wrench in the 2nd pic) far before you can loosen the fan bolt. I tried at least five different pieces of metal procured at various hardware stores and all of them ended up bending like paper under that much stress. The hole in the pulley isn't very big (it's exactly 5mm) and there's only so much shearing strength you can get from a small metal rod or allen wrench. Whomever that works for must not have their fan pulley bolt on very tight.
After much head scratching and net surfing I finally decided to try a different tactic: use a strap wrench to grip the pulley itself directly from the pulley surface. My local hardware store had several strap wrenches and I was able to get one with a nice long rubber strap for $10. It took a while to thread it around the pulley and get a super nice and tight grip on it, but once I finally had it I pulled it tight with all my strength while a friend yanked on the fan bolt with a socket wrench, and we finally got the damn thing off! And with the strap wrench there is absolutely no damage to the pulley. (I had read at least one post somewhere about someone using a massive pliers and buffering it with a cloth, but I would be worried about contorting the pulley.)
Another small thing that I had trouble with was getting the alternator out of the car once it was completely disconnected, even after removing the intake hose. There just wasn't enough room to slip it out of the car, and I really didn't want to disconnect the coolant hose or remove the TB. I ended up loosening all the bolts on the coolant reservoir and on the cage holding the brake vacuum booster, and was able to finally get the alternator out by letting it shove all that stuff aside a half inch or so.
This was on a 2001 1.8T AWM.
#5
10-22-2013, 01:42 AM
Good idea about using a strap wrench. I know I've struggled getting the fan bolt loose, but it's always broken free eventually. Next time around I'll probably switch to an electric fan.
#6
10-22-2013, 10:47 AM

VERY good idea... gives you more room to work around when you're not in service position, and makes getting into service position MUCH easier ('cuz you don't have to deal with the pulley!).
#7
10-22-2013, 06:27 PM

I just wanted to warn people with 1999 cars that there might be a split in the alternator. I decided to order a refurb alternator from an auto part store. What I found out was that specifying a "1999 Audi A4 90 Amp Valeo" was not enough to guarantee getting the correct alternator, I had to actually look at the picture to verify (making sure the alternator I was getting had two ring terminals, in my case). I'm not quite sure why there is a problem since I thought 99.5's were DBC but there must be some sort of split so if you have a 99 you will probably want to take a look at the back of your current alternator and compare it to a picture. Advance auto and NAPA had my correct alternator (along with the other one) but Oreilly did not.
#8
10-23-2013, 03:09 AM

If you looks where he wedged the allen wrench there is a slot right there. It helps a whole lot when removing it you hold the allen wrench in there when u get the bolt off the fan clutch. If that makes sense.
#9
10-23-2013, 03:25 AM
If I understand you properly ... it doesn't matter how well the allen wrench is held if the fan bolt is tight enough. Turning the fan bolt turns the pulley which puts incredible force on the allen wrench and bends it like a paper clip. The other option is a spanner wrench with two 5mm pins, that would allow the pulley to be locked due to all the 5mm holes in it. I can find those for sale online but it would have been impossible to find a specialized european tool like that in a store and I did the whole fix on a Saturday and wasn't able to wait days for something like that to be shipped.
#10
12-02-2014, 01:03 PM

I am having a huge problem trying to get the new alternator to sit inside the bracket housing whatever it is for the bottom bolt to line back up it is just soo tight it does not want to go in , the previous one was equally as tight coming out but was able to pry against to get it to pivot out but new one I dont have that option ?
Stupid question but I am guessing I cannot put grease on the inside of the alternator bolt housing the get it to slip in ? This would probably not be good for the ground ?
Stupid question but I am guessing I cannot put grease on the inside of the alternator bolt housing the get it to slip in ? This would probably not be good for the ground ?