
Valley Pan Gasket; Head Gaskets

#52
 04-20-2009, 04:14 PM
Jim,
damn man.....you're such a nice gentleman. I swear... I wish everybody (including myself) would be as helpful and selfless as you are; but you don't need to hear that to tickle your fancy.
Ok,
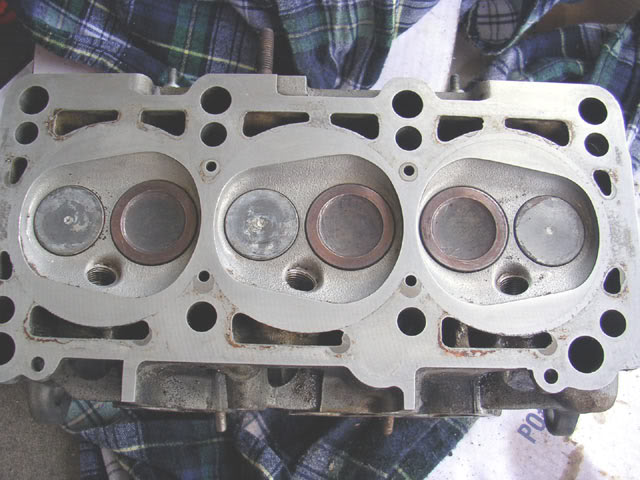
I got done with the passenger side head
Before posting earlier today, I went to O'Reillys to buy some supplies (wire brush, shop towels, and some solvent)... Well, I ended up buying a can of
 .
.
I have never used it before, but it seems to be a good aid if you let it soak long enough.
The carbon buildup on one of the intake valves started to "pop" at some point (with noise, just like firecrackers") ), but that was the only one. I also used brake cleaner... lots of elbow grease, the wire brush (only on the valves), a small scraper (only on the valves), and a Scotch-brite "greenie".
), but that was the only one. I also used brake cleaner... lots of elbow grease, the wire brush (only on the valves), a small scraper (only on the valves), and a Scotch-brite "greenie".
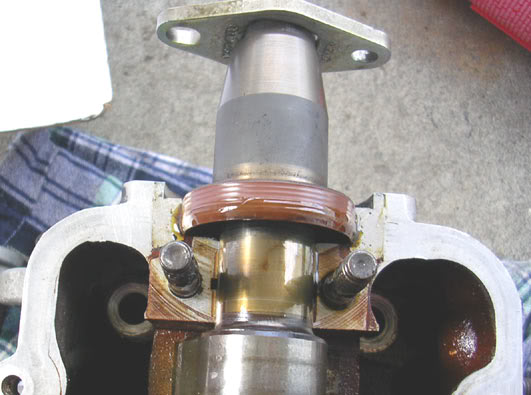
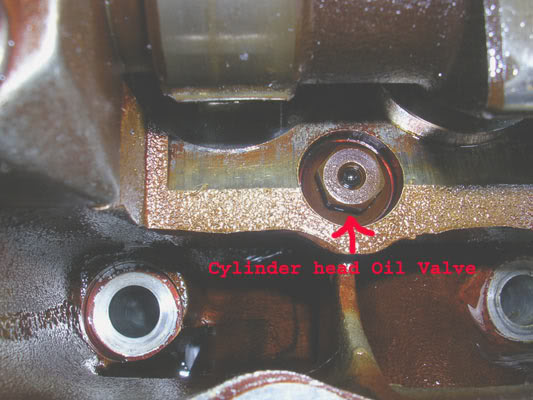
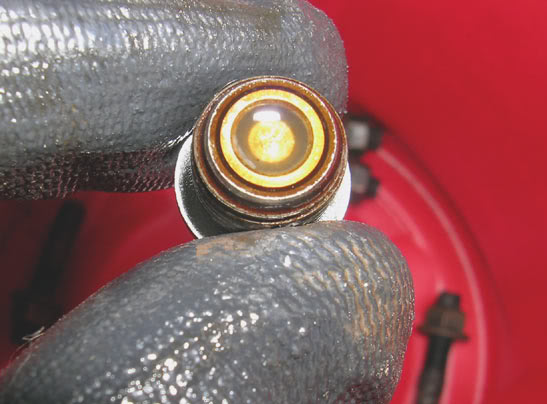
By the way, each head has an oil valve, indeed. I removed it and cleaned it with some brake cleaner. Apparently some "milky" colored stuff came out from it when blowing air and popping in the moving part to let the air through.
I really don't see how that little thing can go bad to the point of needing replacement, unless it really gets seized...
I'll post some pics in a while.
Anyway, I took a break because I wanted to ask you guys:
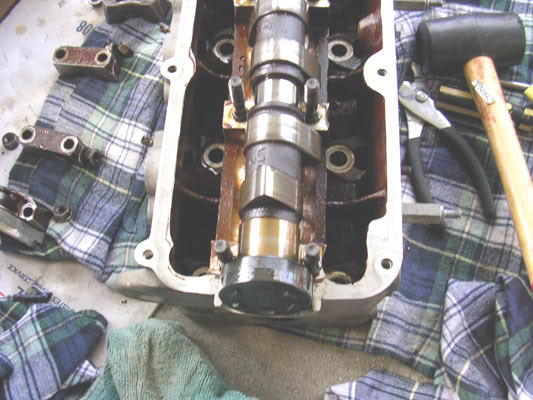
how in the world you suppose to replace the cam plug in the back of the head?
I keep turning it and doesn't want to come out.
Would I still have to take the camshaft out?
Thanks kindly! (for all the info, too!)
john
damn man.....you're such a nice gentleman. I swear... I wish everybody (including myself) would be as helpful and selfless as you are; but you don't need to hear that to tickle your fancy.
Ok,
I got done with the passenger side head
Before posting earlier today, I went to O'Reillys to buy some supplies (wire brush, shop towels, and some solvent)... Well, I ended up buying a can of
. I have never used it before, but it seems to be a good aid if you let it soak long enough.
The carbon buildup on one of the intake valves started to "pop" at some point (with noise, just like firecrackers
), but that was the only one. I also used brake cleaner... lots of elbow grease, the wire brush (only on the valves), a small scraper (only on the valves), and a Scotch-brite "greenie".By the way, each head has an oil valve, indeed. I removed it and cleaned it with some brake cleaner. Apparently some "milky" colored stuff came out from it when blowing air and popping in the moving part to let the air through.
I really don't see how that little thing can go bad to the point of needing replacement, unless it really gets seized...
I'll post some pics in a while.
Anyway, I took a break because I wanted to ask you guys:
how in the world you suppose to replace the cam plug in the back of the head?
I keep turning it and doesn't want to come out.
Would I still have to take the camshaft out?
Thanks kindly! (for all the info, too!)
john
Last edited by chefro; 04-20-2009 at 04:17 PM.
#53
04-20-2009, 06:46 PM
I ended up taking the camshaft off...so problem solved.
-
-
-
The heads have indeed oil valves, as mentioned in the audiworld link you graciously provided. I took it off and cleaned the "interior" as good as I could.
Blowing in it caused some "milky" looking stuff to come out when opening/depressing the valve itself. I used some brake cleaner to "flush" that gunk out. I'll do the same with the driver side head's one, as well.
-
As far as the cleaned head:
-
-
I went to that store/shop and talked to the "machinist" gentleman. He said that the grinding (3-angle valve job) can of course be done.
However: he never worked on/with an Audi, and he doesn't know if after grinding shims are needed or not. If shims are needed to make up for the grinding, then he doesn't know how "shimming" is to be done on these cars (pretty much meaning he wouldn't want to have anything to do with it).
"My" cleaning he said looked pretty good, and unless I really want to have it dipped in caustic cleaner, I don't need to go any further.
If I want the cleaning to be done, and bring the heads in the same condition as the one I showed him (with the camshaft off), then it would cost around $ 90 + the valve seals.
With the grinding, the total would be around $ 150! (Not bad at all) - so $ 30 more per head.
So, to where I stand right now : I can say that I can do everything you suggested guys. The only issue - if shimming is involved or not.
Any ideas?
Tks, nevertheless.
-
-
-
The heads have indeed oil valves, as mentioned in the audiworld link you graciously provided. I took it off and cleaned the "interior" as good as I could.
Blowing in it caused some "milky" looking stuff to come out when opening/depressing the valve itself. I used some brake cleaner to "flush" that gunk out. I'll do the same with the driver side head's one, as well.
-
As far as the cleaned head:
-
-
I went to that store/shop and talked to the "machinist" gentleman. He said that the grinding (3-angle valve job) can of course be done.
However: he never worked on/with an Audi, and he doesn't know if after grinding shims are needed or not. If shims are needed to make up for the grinding, then he doesn't know how "shimming" is to be done on these cars (pretty much meaning he wouldn't want to have anything to do with it).
"My" cleaning he said looked pretty good, and unless I really want to have it dipped in caustic cleaner, I don't need to go any further.
If I want the cleaning to be done, and bring the heads in the same condition as the one I showed him (with the camshaft off), then it would cost around $ 90 + the valve seals.
With the grinding, the total would be around $ 150! (Not bad at all) - so $ 30 more per head.
So, to where I stand right now : I can say that I can do everything you suggested guys. The only issue - if shimming is involved or not.
Any ideas?
Tks, nevertheless.
#54
04-20-2009, 09:28 PM
Dude! You definitely can clean. Those look GREAT! Glad you didnt have to soak it for days. Good call on the Chemtool.
I dont know if you can shim the Audi valves. BUT, would think shimming would be really tough seeing how it uses cam followers and you'd have to mill the tops of the valve stems to make up for the difference, not shim Your valves still look so good - not sunken in - that I would leave'm be (and since the locals dont know either). You also dont seem to need the 'clean-up' mill either since I can still see the original tool marks and your gaskets weren't bad to begin with. Just do yourself a favor and check the heads with a straight edge. You should not be able to get a 6 thousandths feeler gauge between the head and straight edge (no more than 5 thou warpage). Your call if its 1-2 thou more than that. I'd wager they're good.
Ok, removing the cam: You did make sure to note where each bearing cap and bearing goes and thier orientation, correct? Use an assembly lube when you put them back and torque the nuts evenly side to side and front to back and tighten it in 4 steps: 1) Hand tight plus a little, turn the cam to check for binding, 2) then tighten to 1/3 specified torque, and turn cam, 3) tighten to 2/3 specified torque and turn the cam, 4) tighten to spec and check cam turns smoothly. If at any time the cam binds, loosen and adjust the sequence untill you get to where it both turns and your at spec torque. You should'nt have a problem.
Cleaning them valves is also cool. I'd still try to find some replacement o-rings. Good higher heat silicone ones, not your normal rubber ones.
Good job so far!
I dont know if you can shim the Audi valves. BUT, would think shimming would be really tough seeing how it uses cam followers and you'd have to mill the tops of the valve stems to make up for the difference, not shim
Your valves still look so good - not sunken in - that I would leave'm be (and since the locals dont know either). You also dont seem to need the 'clean-up' mill either since I can still see the original tool marks and your gaskets weren't bad to begin with. Just do yourself a favor and check the heads with a straight edge. You should not be able to get a 6 thousandths feeler gauge between the head and straight edge (no more than 5 thou warpage). Your call if its 1-2 thou more than that. I'd wager they're good.Ok, removing the cam: You did make sure to note where each bearing cap and bearing goes and thier orientation, correct? Use an assembly lube when you put them back and torque the nuts evenly side to side and front to back and tighten it in 4 steps: 1) Hand tight plus a little, turn the cam to check for binding, 2) then tighten to 1/3 specified torque, and turn cam, 3) tighten to 2/3 specified torque and turn the cam, 4) tighten to spec and check cam turns smoothly. If at any time the cam binds, loosen and adjust the sequence untill you get to where it both turns and your at spec torque. You should'nt have a problem.
Cleaning them valves is also cool. I'd still try to find some replacement o-rings. Good higher heat silicone ones, not your normal rubber ones.
Good job so far!
Last edited by Midniteoyl; 04-20-2009 at 09:31 PM. Reason: change feeler gauge size - still thinking 'V8' :)

#56
04-20-2009, 11:47 PM
I remembered I used to like going fishing long time back... you know, the patience factor
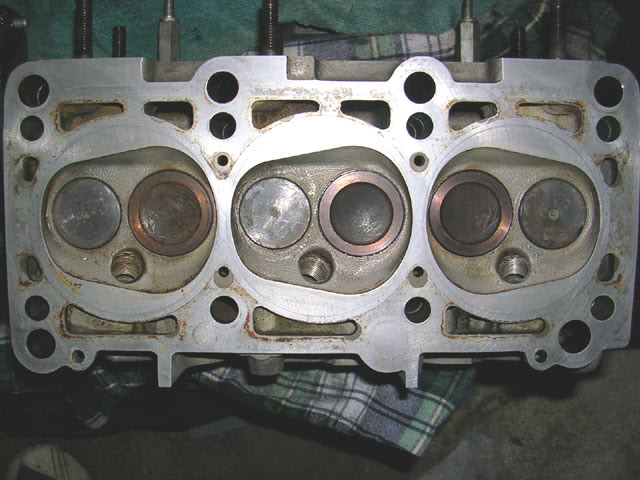
And when I do something for my own benefit, I try to be more thorough with whatever means I got.Although at that point I had enough of it - so it looks a little worse than the passenger side - here's the driver side head as well (in this one I even poured some Chemtool in the valve chambers - twice, letting it soak for about 5 min each time):
-
I dont know if you can shim the Audi valves. BUT, would think shimming would be really tough seeing how it uses cam followers and you'd have to mill the tops of the valve stems to make up for the difference, not shim Your valves still look so good - not sunken in - that I would leave'm be (and since the locals dont know either). You also dont seem to need the 'clean-up' mill either since I can still see the original tool marks and your gaskets weren't bad to begin with. Just do yourself a favor and check the heads with a straight edge. You should not be able to get a 6 thousandths feeler gauge between the head and straight edge (no more than 5 thou warpage). Your call if its 1-2 thou more than that. I'd wager they're good.
Your valves still look so good - not sunken in - that I would leave'm be (and since the locals dont know either). You also dont seem to need the 'clean-up' mill either since I can still see the original tool marks and your gaskets weren't bad to begin with. Just do yourself a favor and check the heads with a straight edge. You should not be able to get a 6 thousandths feeler gauge between the head and straight edge (no more than 5 thou warpage). Your call if its 1-2 thou more than that. I'd wager they're good. I'll do the "3-angle" thingy, when I'll change the valves with new ones...4-5 yrs down the road Anyway, after mounting it back, I'll have to turn it to the previous position since I moved it on order to close those two open valves (for cleaning purposes).
Use an assembly lube when you put them back and torque the nuts evenly side to side and front to back and tighten it in 4 steps: 1) Hand tight plus a little, turn the cam to check for binding, 2) then tighten to 1/3 specified torque, and turn cam, 3) tighten to 2/3 specified torque and turn the cam, 4) tighten to spec and check cam turns smoothly. If at any time the cam binds, loosen and adjust the sequence untill you get to where it both turns and your at spec torque. You should'nt have a problem.
Oh, and not to forget: does it matter what direction (clockwise or counter) you turn the camshaft?
So far I only turned it counterclockwise - it just happened that way.

That way, the guy can check the heads better than probably I would do. If he keeps it "real" and doesn't charge more than the $ 90 figure that came out of his mouth, probably I will do it.
Regardless, I'll keep you guys current.
Next thing is to carve the giant vacuum "melon" and start cleaning that sucker, too. Don't know about the polishing, though. As much as I don't want to disappoint Zippy
, it will depend on how I feel about all that work. Also, I gotta start ordering the parts I need...
Thanks again, Jim.
P.S. Thanks, Crazyguy. I appreciate your kindness.
Last edited by chefro; 04-20-2009 at 11:51 PM.
#57
04-21-2009, 12:21 AM
I'll have to get new seals indeed if I take the heads to be dipped. Ariz Autohaus has V.Reinz/Goetze ones (on sale) for $ .98/piece.
Sorry.. I ment o-rings on the 'oil check valves'. I wouldnt take the heads in if they are not sure about what to do. Besides, you cleaned it up really well. On the otherhand, it would be nice to get new valve seals.Tighten the cam bearing caps in the order of 1-3-2-4. you want both nuts on the same cap to be at the same torque to prevent binding. It doesnt matter what way you turn the cams.
#58
04-21-2009, 12:24 AM
BTW - how long per head did it take to clean? How long did it take the chemtool to loosen the carbon?
#59
04-21-2009, 02:09 AM
The first one it took me longer to clean it. About 2 1/2 hrs... I even tried Oven Cleaner
Anyway, while I was elbowing at the first one, I poured like four different times Chemtool on the other head. I guess the first "application" was around 1:30 PM; then the second one around 2:00; and the third one when I finished the first head, at 3:00.
I took the camshaft off the first one after posting here inquiring about the cam plug, and as soon as I removed it, I decided to go to the shop.
I got back around 4:15, and I posted here the follow up regarding the shop.
Tackling the second head was around 5:30 and I finished around 7 Pm. So it took me less time to clean the second one.
I believe that if you have indeed a pan/receptacle that can hold the heads and you soak them good in Chemtool, then you make your job much easier.
It was all elbow grease. I bought a wire disc to attach to a drill and I haven't even used it. Along the same line of thought, I believe someone with a dremmel and small abbrasive pads can complete the cleaning much, much sooner than me. Contrary to what I read, actually the intake valves were the nastier ones to clean. I had to use a small scraper and really lean on it to progressively get the caked gunk off, no matter how much solvent I used.
That's why soaking probably is the way to go.
Well, you can't expect too much from a first timer....
- About the check valves o-rings, I may look into that when will remove the head gaskets and clean the mating surfaces on the blocks. They sort of looked ok to me, but if I can figure a way to pull those things apart (from recollection I don't think it is possible)...oh nevermind... just looked again at the pic; you refer to the o-ring at the end. Yes, I can take those off and look for something close in dimmension at the autoparts store.
- I'll have to order the valve seals; if I do order them, then I need to do the cleaning . It would be nice to have the heads thoroughly cleaned, with respect to the mating surfaces. Oh well...
By the way, before I turn off the light:
Should I assume that this would be for the final tightening step - up to the required torque?
Wouldn't starting with cap number one (front of the camshaft) create a "titter-totter" effect at the other end, versus starting with either one of the middle ones (2 or 3)?
Is it a matter of securing first the ends with the seal/plug?
Thanks, Jim.
Anyway, while I was elbowing at the first one, I poured like four different times Chemtool on the other head. I guess the first "application" was around 1:30 PM; then the second one around 2:00; and the third one when I finished the first head, at 3:00.
I took the camshaft off the first one after posting here inquiring about the cam plug, and as soon as I removed it, I decided to go to the shop.
I got back around 4:15, and I posted here the follow up regarding the shop.
Tackling the second head was around 5:30 and I finished around 7 Pm. So it took me less time to clean the second one.
I believe that if you have indeed a pan/receptacle that can hold the heads and you soak them good in Chemtool, then you make your job much easier.
It was all elbow grease. I bought a wire disc to attach to a drill and I haven't even used it. Along the same line of thought, I believe someone with a dremmel and small abbrasive pads can complete the cleaning much, much sooner than me. Contrary to what I read, actually the intake valves were the nastier ones to clean. I had to use a small scraper and really lean on it to progressively get the caked gunk off, no matter how much solvent I used.
That's why soaking probably is the way to go.
Well, you can't expect too much from a first timer....
- About the check valves o-rings, I may look into that when will remove the head gaskets and clean the mating surfaces on the blocks. They sort of looked ok to me, but if I can figure a way to pull those things apart (from recollection I don't think it is possible)...oh nevermind... just looked again at the pic; you refer to the o-ring at the end. Yes, I can take those off and look for something close in dimmension at the autoparts store.
- I'll have to order the valve seals; if I do order them, then I need to do the cleaning
. It would be nice to have the heads thoroughly cleaned, with respect to the mating surfaces. Oh well...By the way, before I turn off the light:
Tighten the cam bearing caps in the order of 1-3-2-4. you want both nuts on the same cap to be at the same torque to prevent binding. It doesnt matter what way you turn the cams.
Wouldn't starting with cap number one (front of the camshaft) create a "titter-totter" effect at the other end, versus starting with either one of the middle ones (2 or 3)?
Is it a matter of securing first the ends with the seal/plug?
Thanks, Jim.
#60
04-21-2009, 03:36 AM
You can start with one of the center caps.. main point is to jump back and forth.
Speaking of valve seals and what not, check this tool for Toyotas:
http://video.google.co.uk/videoplay?...69117248322292
they say it should work for most valves with a single keeper grove. Pricey though.
http://www.toyotool.com/
Speaking of valve seals and what not, check this tool for Toyotas:
http://video.google.co.uk/videoplay?...69117248322292
they say it should work for most valves with a single keeper grove. Pricey though.
http://www.toyotool.com/